
Silent Night ornament, adapted from a Dimensions kit "Silent Night Banner" and stitched on 22 count antique white hardanger fabric.
To assemble this octagonal ornament I used one stitched piece, one backing piece, two pieces of cardboard backing, fleece padding, purchased cording and ribbons.

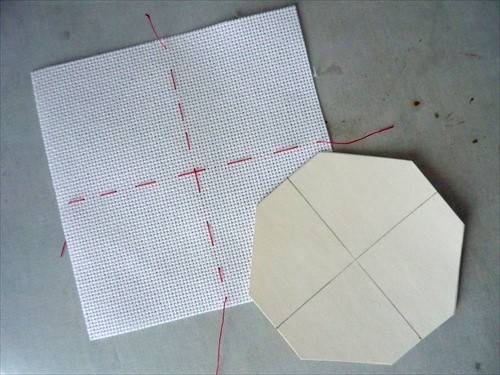
To begin I used pins to mark the desired width of the finished piece. Since the stitched design was as wide as it was high I could just count out the same number of threads from each side. I used this measurement to help mark and cut my backing boards.

I pressed the fabric under along the threads that corresponded to the pins.

I applied glue to one side of each of my backing pieces, (I used glue stick.) and laid them glue side down on the fleece padding. (I like to use thermolam, baby fleece or dense quilt batting.)

When the glue was set I cut the padding around the backing board shapes. (For flat padded ornaments I like to use illustration board or light weight mat board. I'm told that comic book boards are a good weight too.) I then laid them padded side down on the back of the stitched piece and backing fabric.

I applied double sided tape to alternating edges of the backing boards. I explain why I fold the edges for the back and front in a different order on this blog page. (If I didn't have double sided tape I would have preferred using a fast drying glue like Fabritac but white glue works too.)

I removed the backing paper from the tape and folded over the edges. Because of the thickness of the padding the fabric was pulled nice and tight on the front of the ornament. If it wasn't I would have pulled each edge over another thread or so more. (If I had used white glue I would have used clothespins to hold the fabric in place until the glue was dry.)

I applied double sided tape to the free edges of the backing board and folded over the remaining edges of the fabric. Again I pulled the fabric so that it was nice and tight on the front side.

If I had wanted a hanging cord that emerged from the center of the ornament, like this one I made in 2007, I would now have glued it to one of the backs.

I applied glue to the folded over fabric. (I don't apply glue to the center of the ornament when I am gluing the ornament "sandwich" together. That is because some parts at the edge of an ornament may have 4 to 6 layers of fabric and in the center of the ornament there are none. If I forced the centers to stick together I would be making the ornament a little concave at the center.) I used Fabritac glue and I applied a generous amount, but not so much that it would ooze out the sides when I assembled the ornament.

I pressed the two ornament halves together, placed them on a flat surface and applied weight to the top. (If I had used white glue I might have used clothespins around the edge instead.)

When the glue was well set I wrapped the cording around the ornament and cut it to a length that would give the ornament a bit of a tail. I prepared the ends of the cording and used a pin to mark the center of it. Click here to visit the page where I explain how I finish the ends of commercial cording. (Or click here to visit the page where I explain how I make cording and finish the ends as a tassel.)

I stuck the pin into the gap in the top center of the ornament,

then moved the cording out of the way while I used a toothpick to apply glue to the gap along the top edge and the two adjacent sloping sides.

I used a clean toothpick to remove any excess glue, pressed the cording into the glue and inserted a pin just below the end of the glue. I removed any visible glue with another clean toothpick and left the ornament to dry.

When it was dry I removed the pins then used a toothpicks to neatly apply glue to the gap all the way down to the base of the octagon. I pressed the cording into the glue and stuck a pin into the cording at the bottom corner of the octagon. I used a clean toothpick to remove any visible glue and left it to dry.

When the glue was dry I used the same process to glue the cording to the gap at the base of the ornament and left it to dry.

When the glue was dry I removed the pins, threaded a needle with thread that matched the cording and poked it through the cording at the center bottom of the ornament.

I wrapped the two ends of the thread around the cording to form the tail. I threaded both ends of the thread through the needle and stuck it into the center of one of the ends of the cording. When it emerged I gave the thread a tug and cut it close to the cording so that the ends disappeared into the cording.

I laid a piece of 1/4 inch white organdy ribbon over the tail and I tied a piece of narrow navy blue ribbon over the thread wraps and organdy ribbon.

I folded the organdy ribbon down and tied a bow in the navy blue ribbon. I threaded my hanging thread onto a tapestry needle and poked it beneath the cording at the center top of the ornament. I removed the needle, tied a knot and trimmed the cord above the knot.

After I finished this ornament I used the same process to assemble this Santa and Baby ornament. When I folded over the sloped corners I wished that I had taken an extra step to center this ornament because the narrower border around the stitched design made it obvious that the pressed square wasn't enough to keep the border equal all the way around. I had to lift and shift the four folded over edges that I had already stuck down.

Adapted from a Bucilla kit, Santa & Baby
I could have prevented this if I had basted a line that corresponded to all 8 edges, like I did when I made 18 of these ornament in 2007,

or if I had basted the center lines of the design and matched them with center lines drawn on the back of the backing board.


Pinwheel 2012
